Left Continue shopping
Your Order

You have no items in your cart

Blog / Altenew

Altenew 9th Anniversary Blog Hop Day 1 + Giveaway (over $2,500 in Total Prizes)

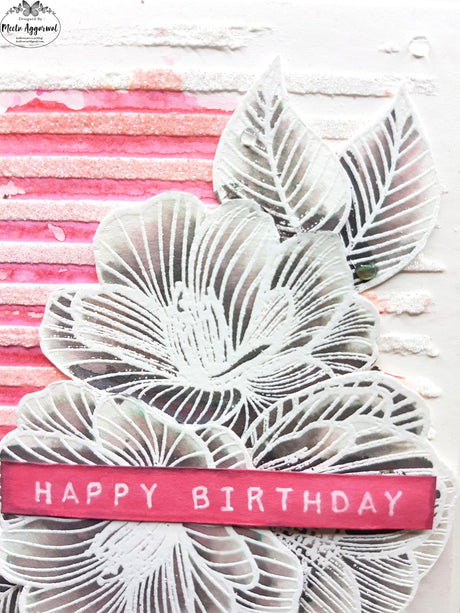
Hello from New Zealand,

We are thrilled to be part of the Altenew 9th Anniversary Blog Hop!!

After a long time, I finally sat down and made a card. Here I have used the Paint-A-Flower Paeonia Japonica Outline Stamp Set from Altenew. I have tried coloring using the Spectrum Noir Bullet tip markers, as it was the first time, I think I need more practise!!

Now for more information about the Blog Hop. 56 winners will be chosen at random from the comments left on any of the blogs listed below and will be announced on the Altenew Blog on 4/21/2023.

Giveaway Prizes

Over $2,500 in total prizes! Altenew is giving away a $50 gift certificate to 10 lucky winners. There are also 24 awesome companies/crafty friends who are celebrating with us, and they are offering the following prizes:

Here’s the list of all the amazing crafters joining today’s blog hop. Make sure you drop by each stop and leave them lots of love!

You are invited to the Inlinkz link party!

Click here to enter

Thank you for visiting once again and have a great day!!

Meetu

Read more

AECP Level 2: Impressive Heat Embossing

Hello,

This is my 8th card for level 2 of AECP. This card is based on Impressive Heat Embossing conducted by Svetlana Marchenko. I tried Ombre heat embossing for the first time. I did not use a solid stamp as suggested but have tried to apply the technique on a background stamp.

For this card I have used the stamp from Beautiful Blossoms stamp set. I took a piece of Neenah Solar White cardstock in size 4” x 5 ¼” and stamped the image using Versamark Ink.

I then applied the Ranger Superfine embossing powder in three different colours Gold, Silver and Rose Gold. I took one colour at a time and poured very little quantity in an area. I manoeuvred the powder by titling and turning the cardstock, this way I was able to apply different colour embossing powders to one image. Once the whole image was covered with embossing powder, I heat set the embossing powder.

Next, I stamped the sentiment You Inspire Me from Altenew Label Love stamp set. I then heat embossed a strip of paper with Rose Gold embossing powder and matted the sentiment strip on it.

I then took an A2 size card base and to make it all cohesive, I heat embossed the card base using the same Rose Gold embossing powder and then adhered the card panel to the card base using some foam tape.

Finally, I attached the sentiment strip to the card panel and used some Coffee coloured Sisal in between to add some more texture.

Hope you like my card today and thank you for visiting my blog.

Happy Crafting,

Meetu

Read more

AECP Level 2: Polychromatic

Hello,

This is my sixth card for the level 2 of AECP. This card is based on Polychromatic class conducted by Nina-Marie Trapani. I have followed the technique taught by her in lesson 3 Faux Handwatercoloured Effect. I did add a bit to her technique, by stamping a second layer to the daises. Hope you like it.

I used a piece of Canson Watercolour paper in size 5 ¼”x4” for stamping. The stamp I have used is Altenew Beloved Daisy. For this card, I did not use my Misti at all, I used acrylic blocks instead.

First, I took the base layer of the Daisy stamp on my acrylic block. I inked the same with Zig Marker in Yellow colour (No.050). Next, I spritz some water to this, which caused the colour pigments to move and carefully stamped the same onto the water colour paper. I positioned and stamped the first layer of all the daisies first, and used the Mask stencil as required.

Once this dried, I took the second layer daisy stamp, inked the same with Light Brown (No.061) Zig Marker and followed the same process. The result of this technique is very loose style water colouring, it did not matter whether the stamps were layered correctly or not.

For the flower centres, I have used Beige (No.072) and Mid Brown (No.065). For the stems and leaves I used Olive Green (No.043)

Once all the stamping was done, I used the sentiment from Adore You stamp set and stamped the same using the Versafine Clair Nocturne Ink.

I then took a Yellow colour A2 size card base and stuck my card panel on it using some foam tape, and finished the card by adding some jewels on it.

Thank you for visiting my blog.

Happy Crafting,

Meetu

Read more

AECP Level 2: Colour Your Day

Hello,

This is my third card for the level 2 of AECP. This card is based on the Colour Your Day class conducted by Therese Calvird. For this card, I have used watercolours and also referred to the Colour Wheel for deciding the colours.

  • I have used the Altenew – Wonderland Stamp Set and the co-ordinating stencil for my card today.
  • First, I stamped the images using the Versafine Clair Nocturne Ink and heat embossed the same using the Ranger Clear embossing powder on an A2 size Arches Cold Press Watercolour paper.
  • I did mask the images as required.
  • Next, referring to the Colour Wheel I coloured all the images and the background using Mijello Mission Gold Watercolours
  • After colouring the images, I splattered some diluted Dina Wakley Acrylic paint on the card panel.
  • I trimmed the card panel by 1/8” from all sides and adhered the same to an A2 size card base using some foam tape.
  • To finish the card, I stamped and adhered the sentiment Thanks a bunch again using some Foam strips.

Hope you have liked my card today. Till next time…

Happy Crafting,

Meetu

Read more
AECP Level 1: Final Challenge (Part 2) Feminine Card

AECP Level 1: Final Challenge (Part 2) Feminine Card

Hello, Welcome to my Blog!

The card I am sharing today incorporates three techniques Emboss resist, creating texture with Embossing Paste/stencil and Painting with Inkpads. This is Part 2 of the final challenge given to me at the Altenew Academy. Hope you like the card. I do have a video tutorial.

Here is the video tutorial…

I have used the beautiful floral set Cherished Memories by Altenew. As I plan to colour the blooms with water based Altenew inks, I have taken a piece of Canson watercolor paper.

As the stamp is brand new, I did prep it first by rubbing the same with an eraser.

For heat embossing I first prep the paper with an anti-static powder as I did not want the embossing powder to stick everywhere. Next, using Versamark ink and Judikins Iridescent sparkle powder I heat emboss all the blooms in the set.

Now for my favourite part, water-colouring. I built on the colour of the blooms and leaves in layers. I coloured the base very light and slowly moved to a darker shade with each layer. I realised that the inks moved better when I was using a water brush instead of normal brush. I coloured one petal at a time. Using a water brush I was spreading water first then just dropping colour wherever I wanted to show shadows on a petal. Also, as I had heat embossed the blooms and leaves, it was easy to colour them.

Once I was satisfied with the colouring, I used a pair of scissors to fussy cut all the elements.

For the card base I again took Canson water colour paper. To create texture onto the background, I took some embossing paste and mixed some Glitter to it. I then applied this paste to the background using classy stripes stencil and a spatula.

Once the paste had dried, I picked some coral berry ink with my watercolor brush, and gently squeezed the barrel. This diluted the ink and it spread out beautifully onto the paper.

I did apply the ink in same manner 2-3 times. Once satisfied, I used the heat gun to dry the base.

Once done I arranged the flowers as desired. Using press n seal, I then picked the arrangement and applied adhesive and foam squares to this arrangement. Once done, I pressed the arrangement onto the ready panel. I did check the pieces and used more glue as required.

Next, I took the darkest ink and applied the same to the shadow areas. This really made each level distinctive.

Now for the sentiment, I again choose Altenew Label love stamp set. After stamping and cutting the strip, I did go over the edges with the Coral Berry ink.

Whenever I am making a card, I do try and follow the rule of thirds. So here too, I used the same to decide the placement of the sentiment. Once done, I used some glue and foam strip to adhere the sentiment to the card.

For the card base, I took an A2 size top folding card, I glued down the ready panel onto the same. For the final touch, I applied Nuvo drops Morning Dew.

Hope you liked the card. Thank you for reading and happy crafting.

“”
Neenah 80lb Classic Crest Cardstock
Shop at:
Krafters Cart
Scrapbook Adhesives 3D Foam Squares Variety Pack
Shop at:
Krafters Cart
Idea-Ology Design Ruler 12″
Shop at:
Krafters Cart
ORIGINAL MISTI LASER ETCHED
Shop at:
Krafters Cart
Neenah 110# Classic Crest Cardstock
Shop at:
Krafters Cart
Dreamweaver Embossing Paste 4oz Regular
Shop at:
Krafters Cart
EK Tools Mini Scoring Board
Shop at:
Krafters Cart
Large Teflon Bone Folder
Shop at:
Krafters Cart
Tim Holtz Guillotine Comfort Trimmer 8.5″
Shop at:
Krafters Cart
Canson XL Watercolor Paper Pad 9″X12″
Shop at:
Krafters Cart
Dina Wakley – Media Palette Knives
Shop at:
Krafters Cart
Altenew – Label Love Stamp Set
Shop at:
Krafters Cart
VersaMark Watermark Stamp Pad
Shop at:
Krafters Cart
Heat It Craft Tool
Heat It Craft Tool
Shop at:
Krafters Cart
Tim Holtz Glass Media Mat
Shop at:
Krafters Cart
Goodbye Static! Anti-Static Pad
Shop at:
Krafters Cart
Tim Holtz Non-Stick Micro Serrated Mini Snips 5″
Shop at:
Krafters Cart
Altenew – Gentleman’s Gray Mini Cube Set
Shop at:
Krafters Cart
Art Institute Glitter – Adhesive – Designer Dries Clear 2oz
Shop at:
Krafters Cart
Darice Double-Sided Foam Sticky Strips 33/Pkg White
Shop at:
Krafters Cart
Altenew – Cherished Memories Stamp Set
Shop at:
Krafters Cart

Judikins – Embossing Powders Iridescent Sparkle
Shop at:
Krafters Cart
Altenew – Tea Party Mini Cube Set
Shop at:
Krafters Cart
Altenew – Watercolor Brushes Bundle
Shop at:
Krafters Cart
Art Institute Glitter – Ultrafine Transparent Glitter – Crystal
Shop at:
Krafters Cart
Altenew – Classy Stripes Stencil
Shop at:
Krafters Cart
Nuvo Crystal Drops Morning Dew
Shop at:
Krafters Cart
Read more
AECP Level 1: Final Challenge (Part 1) Masculine Card

AECP Level 1: Final Challenge (Part 1) Masculine Card

Today, I am going to share a masculine birthday card. This is a part of the final challenge given to me for completing Level 1 of the Altenew Educator Certification Program. I do have a video tutorial too.

I was asked to create a masculine card using any three techniques learnt in the Level 1 classes held at the Altenew Academy. Here is the video tutorial:

I used the three basic techniques, Ink Blending, Layer Stamping and heat embossing to add shimmer and shine to my card.

For my card I have used Altenew’s Arabesque Medallion Stamp set. I really found this motif stamp very elegant and pretty.

Firstly, I took a 5”X 7” Neenah Solar White 80 pounds cardstock. I mounted the motif to my MISTI door and used the Versafine Onyx Black Ink, to stamp the image. As the stamp was already mounted, I also took a sheet of Inkadinkado masking paper and stamped the motif on that too.

Next, I selected the parts of the motif which I wanted to heat emboss. There are many small stamps in this set which can be used to add colour and these fit perfectly onto the big motif.

Using Versamark Ink and some Superfine Gold embossing powder, I then heat emboss the desired parts. For every portion I was heat embossing I was using the Anti-Static powder before-hand, to avoid getting the embossing powder everywhere.

Next, I took the masking paper on which I had stamped the motif. Using a pair of scissors first I fussy cut the outside border line and remove all the extra paper. Next, using a pencil I marked the parts through which I wanted the background colour to show. Now these were the parts I had to fussy cut. For this I used a paper knife. Here is a small tip, the parts which I wanted to remove, I cut slits into them. Then I could cut these using my pointy scissors easily.

As this motif is a repetitive pattern, I did not bother to cut it fully and decided to just flip the mask once half way through with the ink blending. I will make sense in few seconds so please bear with me.

Once the fussy cut was done, I adhered the mask to the heat embossed card base. I have recently swatched all my Altenew and Distress Oxides and these are really helpful in choosing the right ink for a project.

I choose the Distress Oxide Faded Jeans for the background color. Using my Picket Fence Studio Life Changing Brushes, I applied the ink to the background. I then used the Distress Spray bottle to spray water onto the background to create some textures. I did use my heat gun to dry the water. Next, I took the mask out and carefully flipped and adhered it to the other half and repeated all the steps. I then carefully peeled off the masking paper.

At this time, I noticed that there were some very thin portions at the margins still white. So, I took a thin brush and applied the distress oxide, this just made the inking very neat.

Next, I took three colours, which went well with the Faded Jeans distress oxide. I layered and stamped all the small images to create a pattern on the motif.

Once stamped I again used a brush and Altenew inks to cover up the portions which I had missed inking while layering.

At this point, I decided to add more shimmer to my card, but it was a failed attempt as the grey ink somehow turned all pink, so I did layer and stamp again with the grey ink. This added ink layer actually made those potions pop.

Next, I trimmed my panel to a 5” x 5” square, and also prepared a top folding card base 5.5” x 5.5”. I also took another piece of cardstock 5.25” X 5.25” for matting the stamped panel. To this matting, I added the Altenew ink to match the inked panel. I then used Art Glitter Glue to stick all the layers together.

For the sentiment, I used the Happy Birthday sentiment from Label Love Stamp set. After stamping and cutting the sentiment strip, I did use my copic marker in black color and went over all the edges of the sentiment strip. This just makes the strip pop up and hides the white cardstock.

I did use foam strips to create dimension and for adhering the sentiment strip to the card.

Finally, to finish off the card, I used some black sequins.

Neenah 80lb Classic Crest Cardstock
Shop at:
Krafters Cart
Scrapbook Adhesives 3D Foam Squares Variety Pack
Shop at:
Krafters Cart
Idea-Ology Design Ruler 12″
Shop at:
Krafters Cart
ORIGINAL MISTI LASER ETCHED
Shop at:
Krafters Cart
Neenah 110# Classic Crest Cardstock
Shop at:
Krafters Cart
VersaFine Pigment Ink Pad Onyx Black
Shop at:
Krafters Cart
Inkadinkado Stamping Mask Paper
Shop at:
Krafters Cart
EK Tools Mini Scoring Board
Shop at:
Krafters Cart
Large Teflon Bone Folder
Shop at:
Krafters Cart
Tim Holtz Guillotine Comfort Trimmer 8.5″
Shop at:
Krafters Cart
Crafters Companion – Go Machine
Shop at:
Krafters Cart
Ranger Embossing Powder Super Fine Gold
Shop at:
Krafters Cart
Altenew – Label Love Stamp Set
Shop at:
Krafters Cart
VersaMark Watermark Stamp Pad
Shop at:
Krafters Cart
Heat It Craft Tool
Heat It Craft Tool
Shop at:
Krafters Cart
Jewel Picker Double Ended
Shop at:
Krafters Cart
Altenew – Arabesque Medallion Stamp Set
Shop at:
Krafters Cart
Tim Holtz Ink Pad Distress Oxides Ink Pad Faded Jeans
Shop at:
Krafters Cart
CREATIVE CORNERS
CREATIVE CORNERS
Shop at:
Krafters Cart
Tim Holtz Glass Media Mat
Shop at:
Krafters Cart
Goodbye Static! Anti-Static Pad
Shop at:
Krafters Cart
Tim Holtz Non-Stick Micro Serrated Mini Snips 5″
Shop at:
Krafters Cart
Picket Fence Studios Blender Brushes 10/Pkg
Shop at:
Krafters Cart
Tim Holtz Distress Sprayer 4oz
Shop at:
Krafters Cart
Art Impressions – WC Brush NO. 1
Shop at:
Krafters Cart
Altenew – Gentleman’s Gray Mini Cube Set
Shop at:
Krafters Cart
Altenew – Delectable Delights Mini Cube Set
Shop at:
Krafters Cart
Art Institute Glitter – Adhesive – Designer Dries Clear 2oz
Shop at:
Krafters Cart
Darice Double-Sided Foam Sticky Strips 33/Pkg White
Shop at:
Krafters Cart
Read more